PBL Halloween Game - DONE
Initial Pitch idea Presentation (Preproduction)


Unity Practice P.t.1
During the first Unity Practice session I had created a small scene with a ground with a green color material applied to it and a prefab of a tree that was made using a green sphere and a brown rectangle. I then made another scene but with bushes and colored boxes, the brown cardboard boxes have a 'rigidbody' component applied to each of them so they can be knocked over.

Vampire Model P.t. 1 And the image above was my first go at using substance painter to try painting on the textures of the model. The torso and Collar's UVs didn't port correctly, the mask fill layer was a little difficult to work with when it cam time to add unique details as I had to draw them on twice (once on the base layer and again on the mask layer), and there was also unaccounted for out of place polygons that got caught in the texture mapping and UV importing.
This (the image below) was the first instance of solo use of 3D modelling software by me for creating models for this project, as of when this screenshot was took there was no set-up armature, functioning textures, or animations and was just a plain mesh but it provided the framework for the vampire monster.
And the image above was my first go at using substance painter to try painting on the textures of the model. The torso and Collar's UVs didn't port correctly, the mask fill layer was a little difficult to work with when it cam time to add unique details as I had to draw them on twice (once on the base layer and again on the mask layer), and there was also unaccounted for out of place polygons that got caught in the texture mapping and UV importing.
House P.t. 1

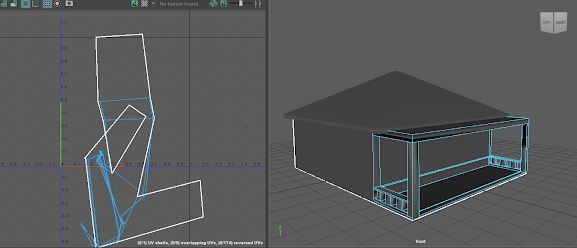
In an introduction to Maya I started to create a house Model for use in our environment. However, this base was poorly made without knowing what the extrude tool was and the UV nightmare that spawned from this will 'unfold' (XD) later into development when we get to learning about texture mapping.
Project Preproduction


We used Trello to help us with planning out our project through use of its helpful labels and the practice of 'Kanban'. Kanban is the process of organizing tasks into three lists of 'To-do', 'Doing', and 'Done' to help boost workflow and develop a healthy practice of keeping tasks organized, the literal translation out of Japanese is 'visual signal'. we are also using the labels in Trello to help us filter down what the priority of each thing on the board is, what type of thing it is, and who is doing what when it gets moved to doing so we can pick and choose what we are doing without the pressure of pre-picking and allows us to work on a variety of tasks.
House P.t 2
Unity Practice P.t 2

I have edited the directional light for it to mimic sunlight in colour and intensity and angled it to allow it to cast shadows on the surroundings which gives the world a nice feeling and some atmosphere.
I have also managed to create a 'Warehouse' prefab with 'Ceiling Light' prefabs inside to illuminate it.
 |
| Front View |
 |
| Left View |
 |
| Back View |
 |
| Right View |
 |
| In the Entrance View |

Unity Practice P.t 3
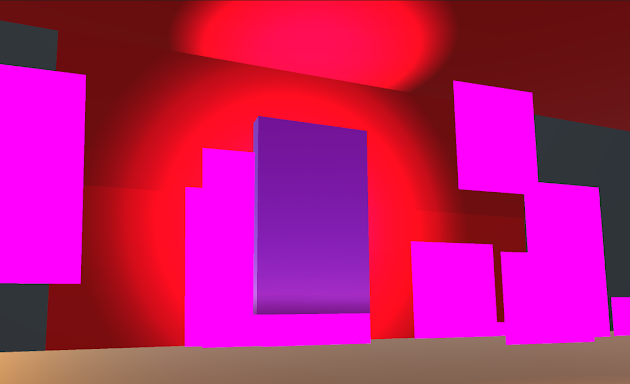
I have managed to create a change scene trigger and applied it to a portal that also has a particle system component applied and is a light source. The portal itself was created using the scale tool and with an applied purple texture to give the shape and color, then I used Unity's particle system to make it emit particles that are purple in color and create intrigue for the player, I also applied a point light that is purple colored as well to increase the intrigue and make it stand out in the warehouse.


Tricks & Treats Development P.t 1

Dream Sequence House P.t 1
I have created a dream sequence variant of the house with an extended roof with windows and holes in the walls to allow for some 'haunted house' gimmicks.
 |
| Front Orthographic View |
 |
| Left Orthographic |
 |
| Back Orthographic |
 |
| Right Orthographic |
 |
| Top Orthographic |
 |
| Bottom Orthographic |
 |
| On a front angle view with whole model selected |

Tricks & Treats development P.t 2
C# Practice

Tricks & Treats Development P.t 3

I have also added color to the ground and segmented it for individual coloring, increased the brightness slightly to allow for more visibility of the map while editing and to actually be able to see, and added tree prefabs to the level (that I had made previously) to allow it to have more of a painted image to help in creating the preview animation that will hopefully remain unchanged once the project is complete and allow an easy preview of the environment of the game.
House P.t 3
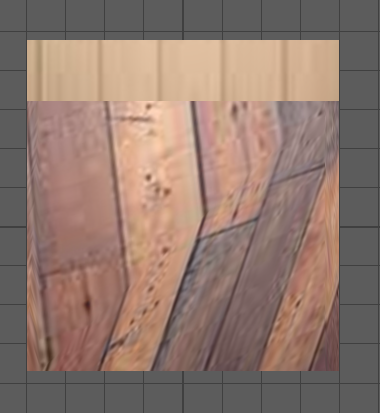
so you remember that UV nightmare?

We learned about texture trim sheets and unwrapping in Maya, but my failed attempt (roughly) a week ago from when I was typing this had left me with a broken UV map that unwraps incorrectly and has improper proportions and faces that don't convert to planar properly for mapping them onto the texture map as I didn't use the extrude tool and instead used edge loops directly next to edge loops to isolate faces instead so there is faces in faces and random edges in faces from the method not being a proper functional method, and in general creating a nightmare that is the consequence of me getting ahead of myself and not asking for help. and I used this model and therefore UV map for the base of the dream sequence variant of the house meaning I have not one but two instances of UV nightmares now being a thorn in my side and a blockade in development of the models for the game, at least the roofs are separate objects to the base house(s) and the archway was made using individual cubes and not through using the extrude tool. At least this likely is the reason behind the broken mesh rendering and mesh seen in Unity for how the whole left side/view for its faces are missing.
Tricks & Treats Development P.t 4
I have finished off the animation for the camera preview which will be kept for when the game is complete to allow easy showcasing of our work in game when it is complete. I have also experimented with the lighting again by lowering the intensity of an area light that I have mimicking the moon and added in streetlights and also messed around with the lighting by checking the settings of the streetlights so they have priority so they render correctly and also added fog to the scene as well using Unity's lighting system. (The Unity Lighting system fog is temporary to help get a feel for it)(all are visible in the video/GIF above)
House P.t 4
It took remaking the base, BUT the basic house w/roof is done and textured! If there was something I would improve if I could it would be changing out the wall textures for something else and making the wood log beams not look like Minecraft logs.
 |
| Front Angled View |
 |
| Front Orthographic View |
 |
| Right Orthographic View |
 |
| Back Orthographic View |
 |
| Left Orthographic View |
 |
| Bottom Orthographic View |
 |
| Top Orthographic View |
 |
| World Borders Selected |
I have added world borders that are invisible large cubes to prevent players from falling off the edge. I have also enhanced the fog to the level it is supposed to be at for playing.

Tricks & Treats Development P.t 6
This was about the time that we were told how much time we actually had left for making things in lessons for the project with the week after that for creating a presentation for presenting the project. (I did put in brackets at the start that the dev. plan was ambitious, and I was oblivious to just how little time we actually had for learning the basics while trying to make a game)

I have added in pumpkins (made by Declan) and Candles (model by Jamie, effects by me) together to provide additional lighting to the scene and to be able to start adding in Halloween style decorations to make the town feel more like its Halloween.


 |
| Fence in Maya |
This was the last piece of development I was able to make, however this one section will be covering work that was made across 3-4 days
Updated preview video
This updated preview video was made before any of the changes seen below were added, however there was the addition of the dirt pathways in the large forest.
 |
| Castle in Unity (made by Coulson) |
 |
| Placeholder Ghost |
 |
| Ghost Movement Script |
The way this script for the ghost's movement works is that it takes the position component from the game object that has the 'Player' tag and then moves the ghost towards that game object relative to how far away it is and using deltaTime and a speed public float that is set in Unity, deltaTime is the time between frames which makes the ghost move in accordance to the current frame rate so if there is a performance drop the ghost won't suddenly teleport directly on top of the player in-between frames.
To make this scene I just made a black box in the sky, placed a camera inside, used the 3D text to make the 'GAME OVER The Monster Got You! Thanks for Playing!' text, and then re-used other assets to put the scene together with the walls and pumpkins for some decoration and candles for some more natural lighting than just a random light source.
 |
| Game Over Screen |
 |
| Game Over Script Functioning |
End: Final Version Preview Video
Unfortunately we had run out of time for working on the project and couldn't add any more assets in, but we have a functioning game that looks nice, has an objective, a game over, and is basically bug free due to how simple it is so overall I would say that this was a success for a first game project. However, if I could start this project all over again I would hit the ground running with making and ironing out the basic gameplay loop and making sure all of that is there first and make the things in the environment have their quality match their size and abundance, such as making higher quality modelled in Maya trees and more clear house textures to allow my effort to be clearly visible. Also, the final presentation PowerPoint slides are below as well.


Comments
Post a Comment