A1: Independent Games Project - DONE
Independent Game Vocational Scenario
Sorcerers of Sunderland DEADLINE - 22/12/23
Brief: Making a Fantasy Style FPS game for Nintendo based in Sunderland.
- Game should look and feel like a Nintendo game with a style that they are known for with bright colours without it being oversaturated/too glossy.
- Asked us (Sunderland College Students) to produce this game as they don't know the area and want a local involved in its production.
- The game may show violence of a slightly more violent nature towards human, non-human, and human-like characters so it is targeted to be a PEGI 12 rating
Requirements
- Control inputs
- Model(s) for the player equipment
- at least one enemy model
- One Core level
- A Health System
Stretch Goals:
- Multiple Enemy Models
- Game Music and Sound FX
- Game Over Screen
- Menus
- Score System
- Large Variety of attacks
Assessment Objectives

GDD (Game Design Document)


Research
Location Research

In the image below I have expanded upon the annotations to include my ideas for what I could have in the level based off of what is already there and starting to form an idea of what the level will include and the context for that level. The context for the level that I have in mind is that you will be currently stationed in an evacuated town that is under siege by The Formless for the final parts of your training as a rookie before a siege is launched against the nearby Rift that the enemy have built a base around for sieging the town that you are stationed in, why they are sieging that individual town is unknown but what is known that only basic Formless have been able to appear from the Rift so far which means that it is vulnerable to an easy siege from the Magic Knights. The main layout for the level has been annotated as: the Sensory Garden and Basketball Courts would be a roughly built Tutorial crash course zone and a Practice grounds where the player would learn the controls of the game and figure out what attacks they can make and use using element combinations; the bowling club, Children's play area, and Café would be the small village with houses and a market being used as a supply and medical area which would allow me to give the player context behind the story and the location the player is in; The small structure that I had spotted in the satellite view of google maps would be used as a marker for the enemies' Rift location/the objective to destroy in the level; the rest of the level would be a semi-dense forest known as Lord Barnes' Forest (named after the lord who had founded the town decades ago). (A1.1 + A1.5)


Style Research
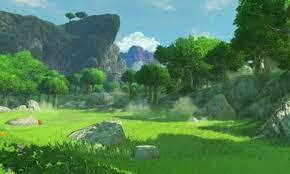
For the art-style of my game I have decided to use The Legend of Zelda Breath of the Wild/Tears of the Kingdom for inspiration behind the style of the world and colour palettes used for designing characters and enemies, which mostly consists of low saturation colours with commonly bright contrasting highlights. (A1.1)
Concept Art
The Formless Concept Art

Above is concept art for the enemy that the player would be fighting in the game, it is a collection of entities identifiable by their mostly solid colour humanoid figure with a personal fog shrouding their body and with abstract shapes floating in said fog, these shapes are believed in world to be their method of communication. The main stand out useful in the context of the game part about them though is their combat state which is identified by a sudden change of colour to their corresponding attack element and their body suddenly becoming 'unstable'. Some inspiration that I took behind this idea was the 'Shades' from Hollow Knight (image below) which gave me the idea of the enemies simply being figures formed from The Void and that don't make any verbal noise.

Weapon Concept Art

 In the above images is the concept art for the weapon the player will be using, it is a wand that is made of patterned wood and has two gemstones embedded into it with strange black parts on it that allows the wand to be used to harness the elemental mana within the gemstones - illuminating the black parts in the colour of the mana flowing through it. There are two gemstones in the wand as I plan (as a stretch goal) to allow the wand to have both elements you have selected/charged into your wand be shown on the wand in a gemstone each and as a dual current through the black parts, but as the basic goal for a nice looking visual effect it will show the primary element selected. If needed I will also change the colours to a more or less saturated version to match the art style if it turns out to be too saturated in the texturing phase of making the wand.
Silhouette Development
 For this bit of work I was asked to develop my silhouette skills for showing preproduction skills by making silhouettes in Photoshop and using them with images and clipping masks (right) and using Photoshop's 'generative fill' AI tools (left). I had used the silhouettes of the top and side of my wand as the base for the clipping mask and generative fill tools but as I already have made my wand I won't be using either of these designs. I also refuse to use AI tools as, if you ask me, if used too much it can take the soul away from the design of a game and it takes several generations for the AI to generate something that I like.
'Attack Selection' and Element Symbol Concept Art
 Depicted in the image above is concept art for the symbols of the elements that the player will wield and an idea as to what the combat UI could look like. In the top left the four elements and their symbols have been drawn out. There are two slots for elements when casting spells which can be set with the number keys: the first slot (1,2,3,4) is for what element the attack will be, in the example the attack would be of the Plant element; the second slot (5,6,7,8) is for what type of attack the attack will be, in the example the type of attack would be an Earth type attack which means that it would be characterized with traits of being slow but deal damage over a large area. The sword and spell icons are for if a spell is being cast in weapon/melee form or ranged/projectile form, these two forms would be either left click/trigger or right click/trigger each with them being interchangeable for the player's preference: in the example the weapon/melee form would be a slow but large attack of the Plant element and for the ranged/projectile form it would be a spell that covers an AoE and is of the Plant element. the spells set would save after casting the attack once which would allow players to use an element combination they like in both forms.
Elements in Combat and individual Attack Concept art
 Detailed in the diagram is an idea on how the elements will function in combat, the premise behind each of the elements, and simplistic visuals of what each attack will be/look like. Along the top is the element symbols, fire, ice, earth, plant, and what the intention behind each element is for what kind of playstyles they would allow and also details what two types of attacks come with that element: fire has an all rounder style of use with the balanced sword and basic ball-based projectiles that have some splash damage for crowds, as one can't go wrong with a good flame sword and fireball; ice has a more agile and hasty playstyle with the trade off of being a single target damage only arsenal for it's attack types, these being the quick bolts of magic and dual daggers; earth has a slower attack speed than the others but has the largest AoE with its types, 'rocking' the mighty great-sword and AoE ground eruptions of spikes of whatever element you are pairing it with; plant has the same quick style of attacks as ice but the trade off is that your damage is lower while keeping an AoE similar in size to fire but being more piercing than sweeping, with having a spear and penetrating beams for its types of attacks. Below that is an illustration of you attacking a Formless, on the left is an illustration of you using an attack of the same attack element as it is and on the right you using an attack that isn't of the same attack element. In the illustration on the left, when an attack's element matches the element of the enemy you are attacking, enemy will have 'resistance' against the attack and does not take any damage. In the illustration on the right the attack element used is not the same and therefore hits the enemy and deals it's damage. Below that is an extensive list of all the attacks possible with the element combinations and forms of attacks with the weapon/melee form on the left of the two and the ranged/projectile form on the right. This is an ambitious list of attacks to model, texture, animate, code into being useable, and balance, but I am currently hopeful about being able to achieve this as I would be able to make a base version of each model (sword, spear, ball, bolt, etc.) and then be able to add extra details to each copy to make them into their respective element and use simple colours that match the theme for texturing them because they are magic attacks and therefore I can stylize them with simple colours without complicated textures.
However, these may end up being a stretch goal as for what I hope to achieve in a playable state at the minimum is just one functioning projectile and one functioning weapon.
Environment Choice Concept Art

In the art pieces above are concepts for the environment of my game, how they were made if it isn't by me, and which ideas were chosen to be used in game. I had made 2 pieces for rift concepts and what state the town would be in as to get some practice for what the process of making concept art in industry would be like. For the enclosed rift I tried to draw it out as a basic scene of the rift being at the end of an enclosed space that is boarded in behind walls and gates deep in the forest and is enclosed in a shrine type structure, the main thing that I took note of in making that is that I suck at environment art. For the Open Air Rift I instead went with the idea of the rift being on a fortified hill with the rift freestanding tall and mighty above the area, however I found the hill difficult to add detail around from not being able to properly think of how I wanted it to look in the area so I added a wooden wall around the base of the hill (translucent to allow for visibility of full structure of hill) but it ended up being too obscure and there wasn't much detail to properly sell the open air rift concept but the style for the rift itself was good. For the town concepts I was struggling to think of what I was going to draw for them as I was unsure if I would actually be able to draw what I was thinking of with me not being too good at environment drawing so I ended up using an image that I could find and liked for what I have in mind and added annotations to it for more specific details and what I would potentially change. But for the post attack town concept I had to use Photoshop's generative fill tools as I couldn't find a good image for it and I wasn't confident in the idea of altering one of the already existing images to match what I was thinking. I asked some of my classmates which concepts they preferred and they said that they preferred the enclosed rift and the pre-attack town concepts as they were more realized and had more details with more potential for details than the open air rift and the post-attack town.
Models and In-Unity Development
Layout Blockout
 As you can see in the image above, I have completed a blockout of the layout of the level and used colours to help differentiate between the areas that the player will walk through. The yellow area is an empty street leading to the base zone (blue) that will act as the tutorial area with signs and destroyable objects to teach the player how to play the game. The blue area is the ally base zone/evacuated market area which will provide the player a place to mess around with controls and different spells on targets that will be in that zone. The brown area is a walk to the enemy base through a section of woodlands where small groups of enemies will jump the player from the trees to introduce the player to the Formless and health.The black zone is the enemy base where the player will fight through three combat zones before destroying the rift (the purple stand-in cube) with those zones being the open entrance, a more narrow crowded corridor, and an area with some platforming elements and the rift.
'The Formless' Model
 As shown in the image above I have made a model for The Formless (the enemies) in Maya and have textured it in Substance Painter. I had baked the texture map to the UVs so I can use substance painter's smart materials for making the base and then on a layer on top I had added the markings that were to add detail and a distinguishable 'face' so the player (and I) know where the AI is looking. As of typing this I am yet to learn animation so the animations will be their own segment. If I were to make this model again I would separate the top half of the torso and the bottom half of the torso to allow the model to be animated more dynamically, as it being one whole object has proven to include some difficulty when animating.
Wand Model

 As shown in the image above I have made a model for the wand in Maya and have textured it in Substance Painter. I baked the texture map to the UVs so I can use Substance Painter's smart materials for the base as a mask and then filled in the gemstones with a different texture. I had made this before making the Formless model but as this is the weapon there is basically no animations that I will need to make for this, though I may remake it later on as the player will be looking at this the whole game and therefore is in need of some more detail because of that.
Bolt Model

 As seen in the images above I have created a basic magic bolt model in Maya using simple box modelling, extrusions, and the smooth function. I have then applied a simple texture in Substance Painter by baking the mesh, applying a latex smart texture and then using a colour selection mask I changed the colour to a pale cyan which will allow it to look nice as a basic element-less magic bolt to ensure the combat works and I have a minimal viable product by the deadline.
Sword Model


 As seen in the images above I have created a sword model in Maya using simple box modelling, extrusions, and edgeloops (opting not to smooth as to give it a strong shape) with what seems like an odd looking handle but to actually have the sword appear over the top of the wand while swinging it with the part on the bottom being a sort of connector between the wand and the sword. And I have textured the sword in Substance Painter using a base colour of a cyan with a dust mask applied glass visor smart texture to create a magical looking and reflective look while still remaining solid.
Unity Updates
 In the screenshots above I have: added a first person controller, added the wand into my Unity project and made the character controller its parent so it moves with the player which will allow me to use it as a base for weapon coding and so it has a use in the game as the weapon the player uses, used Probuilder to make a more detailed house stand-in while I lay out the gameplay first to then make the house model in Maya, changed the textures on the ground to resemble a path using recoloured polygons and Unity materials so the player has an idea of where to go and to add some nice detail development, developed the level layout to be a minimum viable product layout instead of just a blockout, and added combat environments for fighting the enemies and to allow the gameplay to become more dynamic in combat.
Weapon Functionality Coding P.t 1

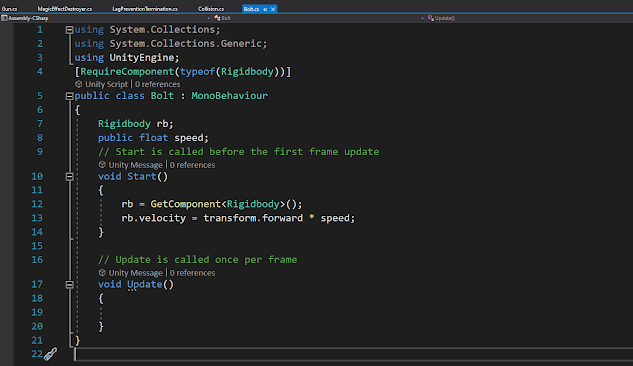
 The code above is the first part to the code for weapon functionality in the game, registering the bolt projectile as one of the projectiles for the weapon to fire and spawning them in upon left click. lines 7 and 8 of the code are for announcing the public variables 'BulletPrefab' GameObject and 'BulletLocation' transform which are used for assigning the bolt to the GameObject and another object as the location for the bolt to spawn (which is the white capsule in the image above, visible for sake of testing). Line 17 is a stability check to ensure the code runs. Line 19 registers if the left mouse button (MouseButton(0)) is being clicked or held in and then line 21 is for spawning in the Bolt (BulletPrefab) at the tip of the wand (BulletLocation) and sets the rotation to the world default (Quaternion.identity), however I will likely be changing this so the rotation of the bolt matches with the rotation of the wand to allow the bolt projectile to be aimed up and down.
Formless Walk Cycle
 In the GIF above is the first animation I have made in Maya and it is a walk cycle for the Formless in their docile state, with the intention to make them seem intelligent but with the rigidness of a slow walking zombie. for making the animation I had some issues with the FPS and getting the speed of the animation right, but it is made up of a starting key frame, an extreme of the body being lined up in the middle, a contact key frame of the enemy stepping forward, another extreme key frame, and an attempted replication of the start key frame to make a loop. For the rigging of the model to make the animation process easier I attempted to make a basic parent-child rig based off of my idea of what that would look like with the main body as the parent to the head, right upper arm, left upper arm, right thigh, and left thigh, with all other parts beyond those being connected to the part before them (e.g. right upper arm being the parent of the right lower arm which is the parent of the right hand). If I where to make this again I would try to make a proper armature set-up instead as rotating the main body made everything else rotate with it and that got annoying to correct, I would make the legs lift off the ground more with the body having a slight up and down bob, and made the arms swing less and instead hang down more as in the animation the arms do look off with their movement, I would also just copy the start key frame to the end instead of trying to replicate it manually as that would prevent the jitter that is visible in the GIF. But for a first animation I would say it is a great success.
Formless Idle Cycle
 As you can see in the GIF above I have made an idle animation for The Formless so they aren't completely stationary when not moving and to breathe some more life into the enemies. If I were to make this animation again I would make the legs bend more and make sure the feet don't slide on the ground.
Formless Left Punch
 As seen in the GIF above I have created a left fist punch animation for The Formless to have when attacking the player in close range, I will also be making an animation for the right fist. If I were to make this again I would make it so The Formless goes forward instead of remaining stationary and having their feet slide.
Weapon Functionality Coding P.t 2
 As you can see in the image above I have updated the weapon code to include the ability to spawn in the sword prefab and added in a rotation variable to use instead of the Quaternion.Identity so the attack points in the right direction to be able to apply a forward vector to the bolt in the right direction and be able to properly aim the attacks.
Weapon Functionality Coding P.t 3


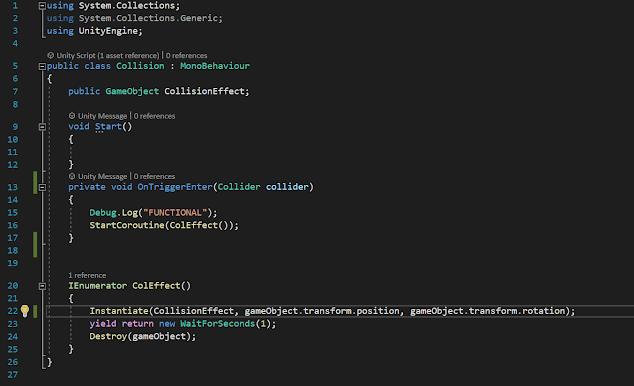
 (these scripts are put into demonstration in the next section)The weapon functionality is complete! the first script is the standard gun script that I had made now with a cast delay between casts so that way the spells get cast at set intervals instead of every frame which allowed for setting a fire rate for the bolts and the sword which also have separate cast delays, these were done using time.time, which is just C# for time, and an addition to that for the delay time which can be used together to make a greater than question which asks if time is greater than the time + cast delay of the last cast, and if it is the player can cast again. The second script is a magic effect destroyer script which takes the time of when the effect was instantiated (created), adds 1 to it, and checks to see if time is greater than the time of instantiation + 1 sum, and if it is it deletes the magic effect that the script is applied to. the third script is the script that controls the bolts movement, it is unchanged. The fourth script is the script responsible for deleting the projectiles on collision with an object and spawning in the magic effect - within the on trigger enter part of the script it prints 'FUNCTIONAL' into the log which was used in testing to ensure that the script was working and collisions were being detected and it also starts a Coroutine called 'terminate delay' which simply spawns in the magic effect, delays the script by 1 seconds, then destroys the object, and a coroutine is a set of code that runs within another set of code to allow for delays to be placed within as if you were to put a delay (e.g. yield return new WaitForSeconds(1) as seen above) in the void Update or OnTriggerEnter functions then you would get either errors or the script wouldn't carry out the delay or skip the delay entirely (I didn't test this so I don't know what it actually will do but these are some rough ideas I have for what an in constantly updating function delay would do. And the final script is another script with a coroutine holding a delay, but for 5 seconds instead of 1, which simply destroys whatever it is attached to after 5 seconds of it being instantiated which I use to prevent the game from lagging itself till it crashes from processing stray projectiles and also limits the players range so they can't use the bolts as a long range rapid fire sniper.
Health System


.gif) As you can see I have created a functioning Health and Damage system with text above enemies used to display their health, text in a UI gameobject for displaying the player's health, and the ability for both the player and individual enemies to keep track of their own health and what they take damage from: however I had made the player and enemy health systems differently so their code is slightly different. The Enemy (target dummy) was set up with both its health and display scripts attached to a one object with the text that displays the health attached to that object as a child, this allowed the enemy health UI script to simply get the text component from the text as the text is a child of the object the enemy UI and health scripts are attached to and then print the health as a string into the text component - the enemy also detects if it is colliding with an object tagged as 'bullet' (the player projectile) or 'sword' (the sword attack) then it takes away health that matches to the amount set by the sword dmg integer and hard set for the bullet dmg. The player is similar to the enemy but the health text had a separate object as it's parent (the UI canvas) so I had to set up a new variable which got the PlayerHP from the PlayerHealth script, the player health script also has an 'invulnerability time' coroutine but it currently doesn't work at granting the player I frames as the script likely runs multiple instances instead of waiting the fractions of a second before running again, I will likely have to make some code similar to the cast delay for functioning invulnerability time.
As you can see I have created a functioning Health and Damage system with text above enemies used to display their health, text in a UI gameobject for displaying the player's health, and the ability for both the player and individual enemies to keep track of their own health and what they take damage from: however I had made the player and enemy health systems differently so their code is slightly different. The Enemy (target dummy) was set up with both its health and display scripts attached to a one object with the text that displays the health attached to that object as a child, this allowed the enemy health UI script to simply get the text component from the text as the text is a child of the object the enemy UI and health scripts are attached to and then print the health as a string into the text component - the enemy also detects if it is colliding with an object tagged as 'bullet' (the player projectile) or 'sword' (the sword attack) then it takes away health that matches to the amount set by the sword dmg integer and hard set for the bullet dmg. The player is similar to the enemy but the health text had a separate object as it's parent (the UI canvas) so I had to set up a new variable which got the PlayerHP from the PlayerHealth script, the player health script also has an 'invulnerability time' coroutine but it currently doesn't work at granting the player I frames as the script likely runs multiple instances instead of waiting the fractions of a second before running again, I will likely have to make some code similar to the cast delay for functioning invulnerability time.Formless Right Punch + Casting + Rig Update
As you can see I have been informed that the quick rig tool is a thing and I had wasted my time using a parent child rig earlier, the quick rig tool simply being a tool in Maya which allows the user to create a quick rig with either the click of a button or setting up of some guides (indicators to the program of what is where in the model) and then clicking a button - however this tool only works on humanoid models and not for anything with additional limbs or isn't of a humanoid shape, which would either have to have the additional bones and joints added on or would have to have a custom made rig made for it. However, using the rig made by the quick rig tool I had finished off making the animations I intend to use with the Formless which now includes, an idle animation, a movement cycle, a left punch animation, a right punch animation, and a casting animation. I am proud with how all these animations turned out considering this was the first model I have ever animated but I do wish I was told about the quick rig tool sooner.Deadline - 21/12/23 + 22/12/23
Unfortunately, I have run out of time for working on this project. As I am typing this and finishing off this blogger page in general it is the 22nd of December and the last day of in-engine development was the 21st. What the end product of the game ended up becoming was a glorified shooting gallery with movement and a half finished environment, but it does have a win condition and a 'win screen'. The final bits of development I did for the game was adding in the Formless with their idle animation only as I couldn't figure out how to work the animation controller to implement the other animations and I knew I wouldn't be able to figure out how to code a whole enemy AI in the span of the few hours I had left in me for crunching on this project so I ended up having the Formless just be stationary targets with their idle animation for the player to shoot, however I was able to give the rift (the cube at the end of the level) its own health and UI scripts for allowing there to be a win condition for the player to achieve which was simply to just kill the rift the same way you kill everything else, and when you do kill the rift the win screen appears.Postmortem
What Went Well
Overall, for an independent project being my second project and having only started out with Maya and coding and Unity tools 3 months ago I would say I'm proud of what I have managed to accomplish and that, in my opinion, it meets the project brief criteria quite well. In this period of time I have managed to create a functional weapon with collision effects, a health system, a core level, a bunch of animations, research for the game, and concept art for plenty of aspects of the game. I had also learned plenty for what tools I have available to me which include, Maya's rigging and animation tools, Substance Painter, ProBuilder, coroutines, and time.time. I also I have gained plenty of knowledge about the pipeline for making a game which includes, making several pieces of concept art to allow for choice and experimentation, level blockouts, keeping the scope small, understanding the limits of my own programming knowledge, and leave extra details and animations for the end when you know you can implement them and everything else works. I have displayed a Trello board I was using during development to help visualise this for the progress I managed to make on the project and what I managed to complete.
What Went Wrong
As I eluded to in my details of what I learned about the pipeline for game development, and the stretch goals + to-do list, I didn't have a good pipeline for the development of this game and was too ambitious in what I wanted to make. I failed to realise early on that my goal of a element based casting system was too complicated for this project and was too confident in my ability to pick up knowledge easily and ended up not being able to have enough time to learn about enemy AI creation, NavMesh pathfinding and Unity's animation controller elements which meant that I ended up wasting roughly 10 hours of development time on animations that ended up never making it into the end product due to not having the time to learn how to implement them as I had spent most of the project just making whatever I can whenever I can, which was a mindset that was fuelled by the circumstance with how I had made my project in the beginning as only 1 room in the college had the version of the Unity editor I was using on it and I didn't want to risk corrupting what I had made from changing what version of the Unity Editor the project was built in.What Will I Do Differently Next Time
I will make sure to keep the scope smaller next time with a simple concept so I can then expand upon it with more complicated things later on if I have time for it, I will hard focus on ensuring I have a strong foundation for the game and ensure I stick only to simple placeholders and blockouts until that foundation is complete, and I will ensure to create multiple pieces of concept art to allow for iteration and experimentation to expand upon the idea of what the game is to refine the vision of the game to something that is achievable with my skillset and the time I have for the project. As for the Blog for the next project, I will go back to adding things as they are made and I will ensure to add dates to each thing for when they were made and added to the Blog, even if they are half finished or only just started. I will also look to continue expanding my knowledge on C# to allow for more complicated things in later projects and will work on my art skills to allow myself to have higher quality concept art to help in visualisation with myself for my vision and to help bring clarity to team projects.
For this bit of work I was asked to develop my silhouette skills for showing preproduction skills by making silhouettes in Photoshop and using them with images and clipping masks (right) and using Photoshop's 'generative fill' AI tools (left). I had used the silhouettes of the top and side of my wand as the base for the clipping mask and generative fill tools but as I already have made my wand I won't be using either of these designs. I also refuse to use AI tools as, if you ask me, if used too much it can take the soul away from the design of a game and it takes several generations for the AI to generate something that I like.
'Attack Selection' and Element Symbol Concept Art
Depicted in the image above is concept art for the symbols of the elements that the player will wield and an idea as to what the combat UI could look like. In the top left the four elements and their symbols have been drawn out. There are two slots for elements when casting spells which can be set with the number keys: the first slot (1,2,3,4) is for what element the attack will be, in the example the attack would be of the Plant element; the second slot (5,6,7,8) is for what type of attack the attack will be, in the example the type of attack would be an Earth type attack which means that it would be characterized with traits of being slow but deal damage over a large area. The sword and spell icons are for if a spell is being cast in weapon/melee form or ranged/projectile form, these two forms would be either left click/trigger or right click/trigger each with them being interchangeable for the player's preference: in the example the weapon/melee form would be a slow but large attack of the Plant element and for the ranged/projectile form it would be a spell that covers an AoE and is of the Plant element. the spells set would save after casting the attack once which would allow players to use an element combination they like in both forms.
Elements in Combat and individual Attack Concept art
Detailed in the diagram is an idea on how the elements will function in combat, the premise behind each of the elements, and simplistic visuals of what each attack will be/look like. Along the top is the element symbols, fire, ice, earth, plant, and what the intention behind each element is for what kind of playstyles they would allow and also details what two types of attacks come with that element: fire has an all rounder style of use with the balanced sword and basic ball-based projectiles that have some splash damage for crowds, as one can't go wrong with a good flame sword and fireball; ice has a more agile and hasty playstyle with the trade off of being a single target damage only arsenal for it's attack types, these being the quick bolts of magic and dual daggers; earth has a slower attack speed than the others but has the largest AoE with its types, 'rocking' the mighty great-sword and AoE ground eruptions of spikes of whatever element you are pairing it with; plant has the same quick style of attacks as ice but the trade off is that your damage is lower while keeping an AoE similar in size to fire but being more piercing than sweeping, with having a spear and penetrating beams for its types of attacks.
Below that is an illustration of you attacking a Formless, on the left is an illustration of you using an attack of the same attack element as it is and on the right you using an attack that isn't of the same attack element. In the illustration on the left, when an attack's element matches the element of the enemy you are attacking, enemy will have 'resistance' against the attack and does not take any damage. In the illustration on the right the attack element used is not the same and therefore hits the enemy and deals it's damage.
Below that is an extensive list of all the attacks possible with the element combinations and forms of attacks with the weapon/melee form on the left of the two and the ranged/projectile form on the right. This is an ambitious list of attacks to model, texture, animate, code into being useable, and balance, but I am currently hopeful about being able to achieve this as I would be able to make a base version of each model (sword, spear, ball, bolt, etc.) and then be able to add extra details to each copy to make them into their respective element and use simple colours that match the theme for texturing them because they are magic attacks and therefore I can stylize them with simple colours without complicated textures.
However, these may end up being a stretch goal as for what I hope to achieve in a playable state at the minimum is just one functioning projectile and one functioning weapon.
Environment Choice Concept Art
In the art pieces above are concepts for the environment of my game, how they were made if it isn't by me, and which ideas were chosen to be used in game. I had made 2 pieces for rift concepts and what state the town would be in as to get some practice for what the process of making concept art in industry would be like.
For the enclosed rift I tried to draw it out as a basic scene of the rift being at the end of an enclosed space that is boarded in behind walls and gates deep in the forest and is enclosed in a shrine type structure, the main thing that I took note of in making that is that I suck at environment art. For the Open Air Rift I instead went with the idea of the rift being on a fortified hill with the rift freestanding tall and mighty above the area, however I found the hill difficult to add detail around from not being able to properly think of how I wanted it to look in the area so I added a wooden wall around the base of the hill (translucent to allow for visibility of full structure of hill) but it ended up being too obscure and there wasn't much detail to properly sell the open air rift concept but the style for the rift itself was good.
For the town concepts I was struggling to think of what I was going to draw for them as I was unsure if I would actually be able to draw what I was thinking of with me not being too good at environment drawing so I ended up using an image that I could find and liked for what I have in mind and added annotations to it for more specific details and what I would potentially change. But for the post attack town concept I had to use Photoshop's generative fill tools as I couldn't find a good image for it and I wasn't confident in the idea of altering one of the already existing images to match what I was thinking.
I asked some of my classmates which concepts they preferred and they said that they preferred the enclosed rift and the pre-attack town concepts as they were more realized and had more details with more potential for details than the open air rift and the post-attack town.
Models and In-Unity Development
Layout Blockout
As you can see in the image above, I have completed a blockout of the layout of the level and used colours to help differentiate between the areas that the player will walk through. The yellow area is an empty street leading to the base zone (blue) that will act as the tutorial area with signs and destroyable objects to teach the player how to play the game. The blue area is the ally base zone/evacuated market area which will provide the player a place to mess around with controls and different spells on targets that will be in that zone. The brown area is a walk to the enemy base through a section of woodlands where small groups of enemies will jump the player from the trees to introduce the player to the Formless and health.
The black zone is the enemy base where the player will fight through three combat zones before destroying the rift (the purple stand-in cube) with those zones being the open entrance, a more narrow crowded corridor, and an area with some platforming elements and the rift.
'The Formless' Model
As shown in the image above I have made a model for The Formless (the enemies) in Maya and have textured it in Substance Painter. I had baked the texture map to the UVs so I can use substance painter's smart materials for making the base and then on a layer on top I had added the markings that were to add detail and a distinguishable 'face' so the player (and I) know where the AI is looking. As of typing this I am yet to learn animation so the animations will be their own segment. If I were to make this model again I would separate the top half of the torso and the bottom half of the torso to allow the model to be animated more dynamically, as it being one whole object has proven to include some difficulty when animating.
Wand Model

As shown in the image above I have made a model for the wand in Maya and have textured it in Substance Painter. I baked the texture map to the UVs so I can use Substance Painter's smart materials for the base as a mask and then filled in the gemstones with a different texture. I had made this before making the Formless model but as this is the weapon there is basically no animations that I will need to make for this, though I may remake it later on as the player will be looking at this the whole game and therefore is in need of some more detail because of that.
Bolt Model
As seen in the images above I have created a basic magic bolt model in Maya using simple box modelling, extrusions, and the smooth function. I have then applied a simple texture in Substance Painter by baking the mesh, applying a latex smart texture and then using a colour selection mask I changed the colour to a pale cyan which will allow it to look nice as a basic element-less magic bolt to ensure the combat works and I have a minimal viable product by the deadline.
Sword Model
As seen in the images above I have created a sword model in Maya using simple box modelling, extrusions, and edgeloops (opting not to smooth as to give it a strong shape) with what seems like an odd looking handle but to actually have the sword appear over the top of the wand while swinging it with the part on the bottom being a sort of connector between the wand and the sword. And I have textured the sword in Substance Painter using a base colour of a cyan with a dust mask applied glass visor smart texture to create a magical looking and reflective look while still remaining solid.
Unity Updates


Weapon Functionality Coding P.t 1

The code above is the first part to the code for weapon functionality in the game, registering the bolt projectile as one of the projectiles for the weapon to fire and spawning them in upon left click. lines 7 and 8 of the code are for announcing the public variables 'BulletPrefab' GameObject and 'BulletLocation' transform which are used for assigning the bolt to the GameObject and another object as the location for the bolt to spawn (which is the white capsule in the image above, visible for sake of testing). Line 17 is a stability check to ensure the code runs. Line 19 registers if the left mouse button (MouseButton(0)) is being clicked or held in and then line 21 is for spawning in the Bolt (BulletPrefab) at the tip of the wand (BulletLocation) and sets the rotation to the world default (Quaternion.identity), however I will likely be changing this so the rotation of the bolt matches with the rotation of the wand to allow the bolt projectile to be aimed up and down.
Formless Walk Cycle
In the GIF above is the first animation I have made in Maya and it is a walk cycle for the Formless in their docile state, with the intention to make them seem intelligent but with the rigidness of a slow walking zombie. for making the animation I had some issues with the FPS and getting the speed of the animation right, but it is made up of a starting key frame, an extreme of the body being lined up in the middle, a contact key frame of the enemy stepping forward, another extreme key frame, and an attempted replication of the start key frame to make a loop. For the rigging of the model to make the animation process easier I attempted to make a basic parent-child rig based off of my idea of what that would look like with the main body as the parent to the head, right upper arm, left upper arm, right thigh, and left thigh, with all other parts beyond those being connected to the part before them (e.g. right upper arm being the parent of the right lower arm which is the parent of the right hand). If I where to make this again I would try to make a proper armature set-up instead as rotating the main body made everything else rotate with it and that got annoying to correct, I would make the legs lift off the ground more with the body having a slight up and down bob, and made the arms swing less and instead hang down more as in the animation the arms do look off with their movement, I would also just copy the start key frame to the end instead of trying to replicate it manually as that would prevent the jitter that is visible in the GIF. But for a first animation I would say it is a great success.
Formless Idle Cycle
As you can see in the GIF above I have made an idle animation for The Formless so they aren't completely stationary when not moving and to breathe some more life into the enemies. If I were to make this animation again I would make the legs bend more and make sure the feet don't slide on the ground.
Formless Left Punch
As seen in the GIF above I have created a left fist punch animation for The Formless to have when attacking the player in close range, I will also be making an animation for the right fist. If I were to make this again I would make it so The Formless goes forward instead of remaining stationary and having their feet slide.
Weapon Functionality Coding P.t 2
As you can see in the image above I have updated the weapon code to include the ability to spawn in the sword prefab and added in a rotation variable to use instead of the Quaternion.Identity so the attack points in the right direction to be able to apply a forward vector to the bolt in the right direction and be able to properly aim the attacks.
Weapon Functionality Coding P.t 3


(these scripts are put into demonstration in the next section)
The weapon functionality is complete! the first script is the standard gun script that I had made now with a cast delay between casts so that way the spells get cast at set intervals instead of every frame which allowed for setting a fire rate for the bolts and the sword which also have separate cast delays, these were done using time.time, which is just C# for time, and an addition to that for the delay time which can be used together to make a greater than question which asks if time is greater than the time + cast delay of the last cast, and if it is the player can cast again. The second script is a magic effect destroyer script which takes the time of when the effect was instantiated (created), adds 1 to it, and checks to see if time is greater than the time of instantiation + 1 sum, and if it is it deletes the magic effect that the script is applied to. the third script is the script that controls the bolts movement, it is unchanged. The fourth script is the script responsible for deleting the projectiles on collision with an object and spawning in the magic effect - within the on trigger enter part of the script it prints 'FUNCTIONAL' into the log which was used in testing to ensure that the script was working and collisions were being detected and it also starts a Coroutine called 'terminate delay' which simply spawns in the magic effect, delays the script by 1 seconds, then destroys the object, and a coroutine is a set of code that runs within another set of code to allow for delays to be placed within as if you were to put a delay (e.g. yield return new WaitForSeconds(1) as seen above) in the void Update or OnTriggerEnter functions then you would get either errors or the script wouldn't carry out the delay or skip the delay entirely (I didn't test this so I don't know what it actually will do but these are some rough ideas I have for what an in constantly updating function delay would do. And the final script is another script with a coroutine holding a delay, but for 5 seconds instead of 1, which simply destroys whatever it is attached to after 5 seconds of it being instantiated which I use to prevent the game from lagging itself till it crashes from processing stray projectiles and also limits the players range so they can't use the bolts as a long range rapid fire sniper.
Health System


.gif)
As you can see I have created a functioning Health and Damage system with text above enemies used to display their health, text in a UI gameobject for displaying the player's health, and the ability for both the player and individual enemies to keep track of their own health and what they take damage from: however I had made the player and enemy health systems differently so their code is slightly different. The Enemy (target dummy) was set up with both its health and display scripts attached to a one object with the text that displays the health attached to that object as a child, this allowed the enemy health UI script to simply get the text component from the text as the text is a child of the object the enemy UI and health scripts are attached to and then print the health as a string into the text component - the enemy also detects if it is colliding with an object tagged as 'bullet' (the player projectile) or 'sword' (the sword attack) then it takes away health that matches to the amount set by the sword dmg integer and hard set for the bullet dmg. The player is similar to the enemy but the health text had a separate object as it's parent (the UI canvas) so I had to set up a new variable which got the PlayerHP from the PlayerHealth script, the player health script also has an 'invulnerability time' coroutine but it currently doesn't work at granting the player I frames as the script likely runs multiple instances instead of waiting the fractions of a second before running again, I will likely have to make some code similar to the cast delay for functioning invulnerability time.
Formless Right Punch + Casting + Rig Update


As you can see I have been informed that the quick rig tool is a thing and I had wasted my time using a parent child rig earlier, the quick rig tool simply being a tool in Maya which allows the user to create a quick rig with either the click of a button or setting up of some guides (indicators to the program of what is where in the model) and then clicking a button - however this tool only works on humanoid models and not for anything with additional limbs or isn't of a humanoid shape, which would either have to have the additional bones and joints added on or would have to have a custom made rig made for it. However, using the rig made by the quick rig tool I had finished off making the animations I intend to use with the Formless which now includes, an idle animation, a movement cycle, a left punch animation, a right punch animation, and a casting animation. I am proud with how all these animations turned out considering this was the first model I have ever animated but I do wish I was told about the quick rig tool sooner.
Deadline - 21/12/23 + 22/12/23
Unfortunately, I have run out of time for working on this project. As I am typing this and finishing off this blogger page in general it is the 22nd of December and the last day of in-engine development was the 21st. What the end product of the game ended up becoming was a glorified shooting gallery with movement and a half finished environment, but it does have a win condition and a 'win screen'. The final bits of development I did for the game was adding in the Formless with their idle animation only as I couldn't figure out how to work the animation controller to implement the other animations and I knew I wouldn't be able to figure out how to code a whole enemy AI in the span of the few hours I had left in me for crunching on this project so I ended up having the Formless just be stationary targets with their idle animation for the player to shoot, however I was able to give the rift (the cube at the end of the level) its own health and UI scripts for allowing there to be a win condition for the player to achieve which was simply to just kill the rift the same way you kill everything else, and when you do kill the rift the win screen appears.
Postmortem
What Went Well
Overall, for an independent project being my second project and having only started out with Maya and coding and Unity tools 3 months ago I would say I'm proud of what I have managed to accomplish and that, in my opinion, it meets the project brief criteria quite well. In this period of time I have managed to create a functional weapon with collision effects, a health system, a core level, a bunch of animations, research for the game, and concept art for plenty of aspects of the game. I had also learned plenty for what tools I have available to me which include, Maya's rigging and animation tools, Substance Painter, ProBuilder, coroutines, and time.time. I also I have gained plenty of knowledge about the pipeline for making a game which includes, making several pieces of concept art to allow for choice and experimentation, level blockouts, keeping the scope small, understanding the limits of my own programming knowledge, and leave extra details and animations for the end when you know you can implement them and everything else works. I have displayed a Trello board I was using during development to help visualise this for the progress I managed to make on the project and what I managed to complete.
What Went Wrong
As I eluded to in my details of what I learned about the pipeline for game development, and the stretch goals + to-do list, I didn't have a good pipeline for the development of this game and was too ambitious in what I wanted to make. I failed to realise early on that my goal of a element based casting system was too complicated for this project and was too confident in my ability to pick up knowledge easily and ended up not being able to have enough time to learn about enemy AI creation, NavMesh pathfinding and Unity's animation controller elements which meant that I ended up wasting roughly 10 hours of development time on animations that ended up never making it into the end product due to not having the time to learn how to implement them as I had spent most of the project just making whatever I can whenever I can, which was a mindset that was fuelled by the circumstance with how I had made my project in the beginning as only 1 room in the college had the version of the Unity editor I was using on it and I didn't want to risk corrupting what I had made from changing what version of the Unity Editor the project was built in.
What Will I Do Differently Next Time
I will make sure to keep the scope smaller next time with a simple concept so I can then expand upon it with more complicated things later on if I have time for it, I will hard focus on ensuring I have a strong foundation for the game and ensure I stick only to simple placeholders and blockouts until that foundation is complete, and I will ensure to create multiple pieces of concept art to allow for iteration and experimentation to expand upon the idea of what the game is to refine the vision of the game to something that is achievable with my skillset and the time I have for the project. As for the Blog for the next project, I will go back to adding things as they are made and I will ensure to add dates to each thing for when they were made and added to the Blog, even if they are half finished or only just started. I will also look to continue expanding my knowledge on C# to allow for more complicated things in later projects and will work on my art skills to allow myself to have higher quality concept art to help in visualisation with myself for my vision and to help bring clarity to team projects.
Comments
Post a Comment